
Tuesday 5 September 2017
IVE MOVED!!
Just a quick post to let you all know that Ive moved to a new blog.
There were many reasons for this, which I wont bore you with, but you can now find me over at
sew delicately
thanks!
Jessica
Saturday 9 July 2016
Quilt-a-long Geese : :
Quick update on my last post, I have finished my flying geese for the Happy Quilting quilt-a-long.
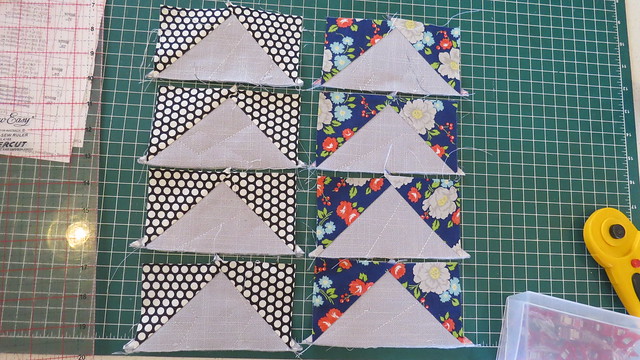
I'm really loving the fabric that I've chosen. I cant wait to sew it all together!!
I have to work this afternoon, so I have a couple of hours with the kids. I might see if i can finalise my fabric choices for the quilt!
Jessica
I'm really loving the fabric that I've chosen. I cant wait to sew it all together!!
I have to work this afternoon, so I have a couple of hours with the kids. I might see if i can finalise my fabric choices for the quilt!
Jessica
Thursday 7 July 2016
Happy Quilting Quilt Along # 3: :
Well, the tumble weeds have been blowing in around here.
There has been lots of sewing going on, but unfortunately not much blogging.
Ill try to catch up on that later, but for the minute, I am joining in again with Happy Quilting's quilt-a-long. YAY! This will be my third happy quilting quilt, and they are always lots of fun. (Check out my first and my second) You can check it out here if your interested in joining in on the fun!
I wanted to make a big quilt. A 4 by 4 layout, in king size. I seriously spent hours last night pulling fabric from my stash. I honestly pulled nearly all of it out, and I'm just not feeling it. I just cant seen to get the right combination of fabric!!
It was doing my head it, so I crammed it all back in my cupboard (folding is for the weak!) and I decided to at least start with a cushion!
I'm making a single block, in the smallest size (20 x 20 inches). Something is better than nothing right? And it lets me still quilt-a-long while i figure out what I'm doing with the quilt.
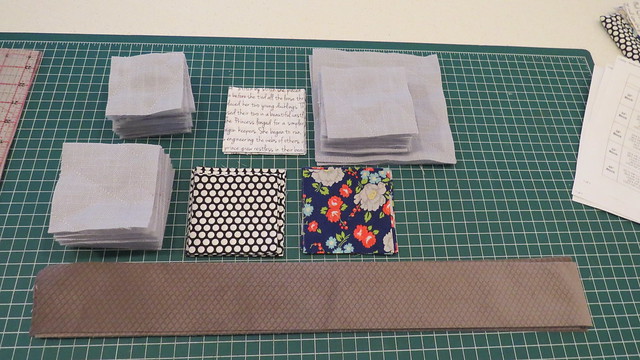
The blue/grey upholstery fabric, and the brown velvet are actually left overs from an Amy Butler ottoman I recently made, more about that later.
The navy floral is from happy-go-lucky, Moda, and the others are just randoms from my stash (I think the script is from Michael Miller).
So that's the cutting done!
Cant wait to put it all together! (and figure out my quilt!)
Jessica
Monday 21 March 2016
Pattern Runway : Kimono Dress
I have had my eyes on the Kimono Dress pattern by Pattern Runway for a while now.
I was just waiting for fabric-inspiration to strike.
Then Tessuti announced on their blog that they were running a competition, with silk crepe-de-chine!!! As soon as I saw this autumn inspired print, I was sold! (and there's still some left at the discounted price!!)
It arrived only 2 days after I ordered it, all wrapped up like Christmas present in an old pattern and tied with a sting. I know it shouldn't matter how its packaged, but to me it totally does!
I unwrapped it eagerly and got sewing! This dress is relatively easy to make, but it took me a looooong time! Many hours went into sewing this dress.


I also lengthened the skirt by 5 inches as I wanted it to hit my knee, and still have a deep hem.


I was just waiting for fabric-inspiration to strike.
Then Tessuti announced on their blog that they were running a competition, with silk crepe-de-chine!!! As soon as I saw this autumn inspired print, I was sold! (and there's still some left at the discounted price!!)
It arrived only 2 days after I ordered it, all wrapped up like Christmas present in an old pattern and tied with a sting. I know it shouldn't matter how its packaged, but to me it totally does!
I unwrapped it eagerly and got sewing! This dress is relatively easy to make, but it took me a looooong time! Many hours went into sewing this dress.
To make it special I wanted to make sure it was finished as professionally inside, as it was outside.
Pattern Alterations: I lengthened the bodice by 3 inches. I originally thought I wanted a nice, big "pouf" over the elastic waist, but after I had sewn it, it was way too much pouf. Yes there is such a thing. It gave me a boxy, really unflattering silhouette. So I painstakingly unpicked the elastic waste and my french seam (believe me silk hates unpicking as much as I do!), and shortened the bodice by 1.25 inches. (so overall my bodice was lengthened by 1.75 inches).
I also lengthened the skirt by 5 inches as I wanted it to hit my knee, and still have a deep hem.
I used french seams where I could, and Hong Kong seams where I couldn't, and to finish off the edges of my facings.
(Just incase you were wondering, yes I'm wearing it inside out, just to show of how nice the innards are!)
I made it up in a size M, grading out to a L at the hips (pear shape). I would definitely recommend grading up a size if your in between or just over sizes at the hips as its quite a slim fit.
I made it up in a size M, grading out to a L at the hips (pear shape). I would definitely recommend grading up a size if your in between or just over sizes at the hips as its quite a slim fit.
I also did a blind hem (by hand I might add!!), and finished it all off with a fabric covered button.
I L.O.V.E. this dress!! x a million!
It feels sooo fancy. I cant wait for someone to have a wedding because I know what I'm wearing!!
This dress contained a few 'firsts' for me. First time Ive hand stitched a hem. First fabric covered button (not hard) and first time doing Hong Kong seams!!
I'm so proud of it! I feel like I'm wearing something from a super expensive designer boutique!
I'm definitely going to use this pattern again. I also want to eliminate the skirt and make a kimono top!
Jessica
Monday 29 February 2016
Desmond Backpack: :
There's a new bag in-town. A handsome, stylish, and completely practical bag. His name is Desmond!
If you haven't seen Taylor Tailor's new backpack popping up allover the place, then head yourself on over to his site here.
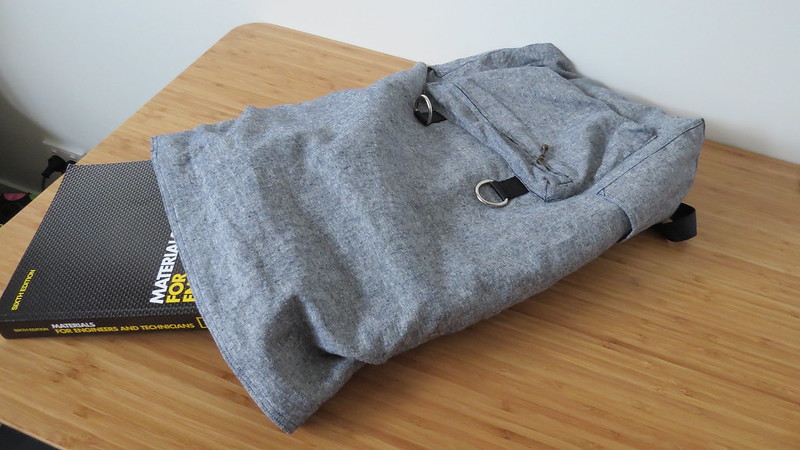
As my dear husband has now started is university degree (mech engineering), he was in obvious need of a bag. A backpack to be precise.
So I hunted through online patterns to find the right bag for my man. And Voila! And new bag was born.

A thousand apologies for the off-focus photo. He was holding a squirmy Little Miss S, who was more than ready to go to bed, so it was hard to get a good shot of the bag (and of course I couldn't wait till she was asleep).
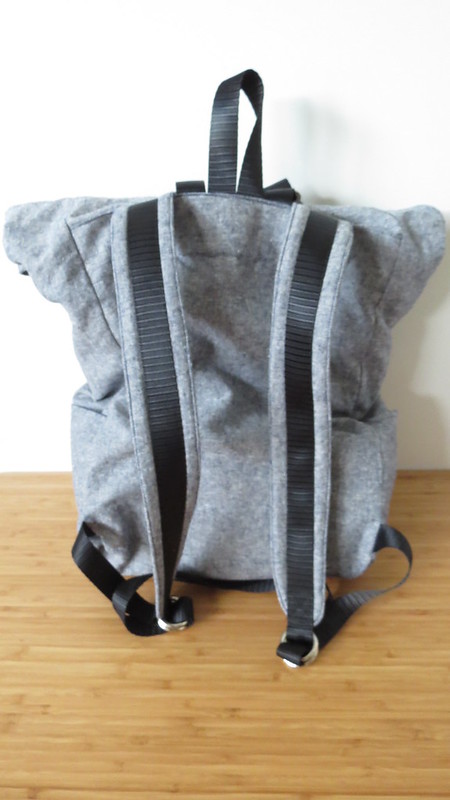
But anyway, you get the idea. This bag is FANTASTIC! and not only does it look great, it holds heaps, has loaads to reinforcing in all the right places, and is really comfortable to wear. Seriously, I want one!
To begin with I was a little worried that it wouldn't be big enough, but I decided to just go with it after reading some other reviews on other blogs. I'm so glad I didn't change the size, as its perfect.
The material was Kaufmann Linen in Indigo, which I picked up for a steal on ebay. I lined the bag with the same fabric, as sometimes the innards can be seen peeking though the roll top (if its not rolled properly), and I think its nice to have the same fabric.
Mr Handsome has already been using this bag (which is why its a little crumpled) and he gives it two thumbs up!
It holds a surprising large amount, and he says its nice and comfortable on his shoulders.
Pattern Alterations:
This pattern is made exactly to the instructions, with a few small exceptions. I put some nice cushy quilting batting (iron-on) in the straps to make them nice and soft, and I lined the lining fabric with medium weight interfacing.
I didn't want to go too-heavy a interfacing, because I wanted to avoid a really stiff, but I did want it to hold a little bit of its shape.
I do want to order some otter wax sometime in the future to make this bag water proof as well. Ill update if and when I do that.
I also ordered all of the hardware from Taylor Tailor, and its top notch. I'm really happy with the quality. Its probably the best I have ever used!
And that's it! I know this bag is going to get plenty of use, and with the amount of reinforcing I did, its going to last a very loooong time!
Jessica
If you haven't seen Taylor Tailor's new backpack popping up allover the place, then head yourself on over to his site here.
As my dear husband has now started is university degree (mech engineering), he was in obvious need of a bag. A backpack to be precise.
So I hunted through online patterns to find the right bag for my man. And Voila! And new bag was born.
A thousand apologies for the off-focus photo. He was holding a squirmy Little Miss S, who was more than ready to go to bed, so it was hard to get a good shot of the bag (and of course I couldn't wait till she was asleep).
But anyway, you get the idea. This bag is FANTASTIC! and not only does it look great, it holds heaps, has loaads to reinforcing in all the right places, and is really comfortable to wear. Seriously, I want one!
To begin with I was a little worried that it wouldn't be big enough, but I decided to just go with it after reading some other reviews on other blogs. I'm so glad I didn't change the size, as its perfect.
The material was Kaufmann Linen in Indigo, which I picked up for a steal on ebay. I lined the bag with the same fabric, as sometimes the innards can be seen peeking though the roll top (if its not rolled properly), and I think its nice to have the same fabric.
Mr Handsome has already been using this bag (which is why its a little crumpled) and he gives it two thumbs up!
It holds a surprising large amount, and he says its nice and comfortable on his shoulders.
Pattern Alterations:
This pattern is made exactly to the instructions, with a few small exceptions. I put some nice cushy quilting batting (iron-on) in the straps to make them nice and soft, and I lined the lining fabric with medium weight interfacing.
I didn't want to go too-heavy a interfacing, because I wanted to avoid a really stiff, but I did want it to hold a little bit of its shape.
I do want to order some otter wax sometime in the future to make this bag water proof as well. Ill update if and when I do that.
I also ordered all of the hardware from Taylor Tailor, and its top notch. I'm really happy with the quality. Its probably the best I have ever used!
And that's it! I know this bag is going to get plenty of use, and with the amount of reinforcing I did, its going to last a very loooong time!
Jessica
Subscribe to:
Posts (Atom)